Thursday, 9 March 2017

Android - LinkedIn Integeration

Android allows your application to connect to Linkedin and share data or any kind of updates on Linkedin. This chapter is about integrating Linkedin into your application.
There are two ways through which you can integrate Linkedin and share something from your application. These ways are listed below.
  • Linkedin SDK (Scribe)
  • Intent Share

Integrating Linkedin SDK

This is the first way of connecting with Linkedin. You have to register your application and then receive some Application Id , and then you have to download the Linkedin SDK and add it to your project. The steps are listed below.

Registering your application

Create a new Linkedin application at https://www.linkedin.com/secure/developer. Click on add new application. It is shown below −
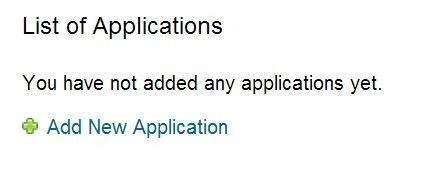
Android Linkedin Tutorial
Now fill in your application name , description and your website url. It is shown below −
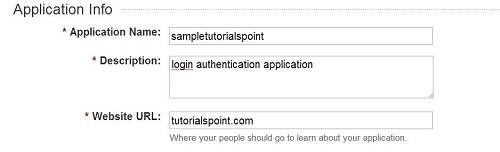
Android Linkedin Tutorial
If everything works fine, you will receive an API key with the secret. Just copy the API key and save it somewhere. It is shown in the image below −
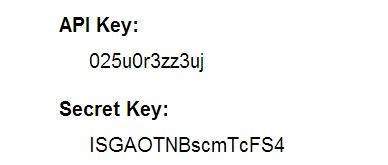
Android Linkedin Tutorial

Downloading SDK and integrating it

Download Linkedin sdk here. Copy the scribe-1.3.0.jar jar into your project libs folder.

Posting updates on Linkedin application

Once everything is complete, you can run the Linkedin samples which can be found here.

Intent share

Intent share is used to share data between applications. In this strategy, we will not handle the SDK stuff, but let the Linkedin application handles it. We will simply call the Linkedin application and pass the data to share. This way, we can share something on Linkedin.
Android provides intent library to share data between activities and applications. In order to use it as share intent, we have to specify the type of the share intent to ACTION_SEND. Its syntax is given below −
Intent shareIntent = new Intent();
shareIntent.setAction(Intent.ACTION_SEND);
Next thing you need to is to define the type of data to pass , and then pass the data. Its syntax is given below −
shareIntent.setType("text/plain");
shareIntent.putExtra(Intent.EXTRA_TEXT, "Hello, from tutorialspoint");
startActivity(Intent.createChooser(shareIntent, "Share your thoughts"));
Apart from the these methods , there are other methods available that allows intent handling. They are listed below −
Sr.NoMethod & description
1
addCategory(String category)
This method add a new category to the intent.
2
createChooser(Intent target, CharSequence title)
Convenience function for creating a ACTION_CHOOSER Intent
3
getAction()
This method retrieve the general action to be performed, such as ACTION_VIEW
4
getCategories()
This method return the set of all categories in the intent.nt and the current scaling event
5
putExtra(String name, int value)
This method add extended data to the intent.
6
toString()
This method returns a string containing a concise, human-readable description of this object

Example

Here is an example demonstrating the use of IntentShare to share data on Linkedin. It creates a basic application that allows you to share some text on Linkedin.
To experiment with this example, you can run this on an actual device or in an emulator.
StepsDescription
1You will use Android studio to create an Android application under a package com.example.sairamkrishna.myapplication.
2Modify src/MainActivity.java file to add necessary code.
3Modify the res/layout/activity_main to add respective XML components
4Run the application and choose a running android device and install the application on it and verify the results
Following is the content of the modified main activity file MainActivity.java.
package com.example.sairamkrishna.myapplication;
import android.content.Intent;
import android.net.Uri;
import android.os.Bundle;

import android.support.v7.app.AppCompatActivity;
import android.view.View;
import android.widget.Button;
import android.widget.ImageView;
import java.io.FileNotFoundException;
import java.io.InputStream;

public class MainActivity extends AppCompatActivity {
   private ImageView img;

   protected void onCreate(Bundle savedInstanceState) {
      super.onCreate(savedInstanceState);
      setContentView(R.layout.activity_main);

      img = (ImageView) findViewById(R.id.imageView);
      Button b1 = (Button) findViewById(R.id.button);

      b1.setOnClickListener(new View.OnClickListener() {
         @Override
         public void onClick(View v) {
            Intent sharingIntent = new Intent(Intent.ACTION_SEND);
            Uri screenshotUri = Uri.parse("android.
               resource://comexample.sairamkrishna.myapplication/*");

            try {
               InputStream stream = getContentResolver().openInputStream(screenshotUri);
            } catch (FileNotFoundException e) {
               // TODO Auto-generated catch block
               e.printStackTrace();
            }

            sharingIntent.setType("image/jpeg");
            sharingIntent.putExtra(Intent.EXTRA_STREAM, screenshotUri);
            startActivity(Intent.createChooser(sharingIntent, "Share image using"));
         }
      });
   }
}
Following is the modified content of the xml res/layout/activity_main.xml.
In the below code abc indicates the logo of tutorialspoint.com
<?xml version="1.0" encoding="utf-8"?>
<RelativeLayout 
   xmlns:android="http://schemas.android.com/apk/res/android"
   xmlns:tools="http://schemas.android.com/tools" 
   android:layout_width="match_parent"
   android:layout_height="match_parent" 
   android:paddingLeft="@dimen/activity_horizontal_margin"
   android:paddingRight="@dimen/activity_horizontal_margin"
   android:paddingTop="@dimen/activity_vertical_margin"
   android:paddingBottom="@dimen/activity_vertical_margin" 
   tools:context=".MainActivity">
   
   <TextView
      android:layout_width="wrap_content"
      android:layout_height="wrap_content"
      android:id="@+id/textView"
      android:layout_alignParentTop="true"
      android:layout_centerHorizontal="true"
      android:textSize="30dp"
      android:text="Linkedin Share" />
      
   <TextView
      android:layout_width="wrap_content"
      android:layout_height="wrap_content"
      android:text="Tutorials Point"
      android:id="@+id/textView2"
      android:layout_below="@+id/textView"
      android:layout_centerHorizontal="true"
      android:textSize="35dp"
      android:textColor="#ff16ff01" />
      
   <ImageView
      android:layout_width="wrap_content"
      android:layout_height="wrap_content"
      android:id="@+id/imageView"
      android:layout_below="@+id/textView2"
      android:layout_centerHorizontal="true"
      android:src="@drawable/logo"/>
      
   <Button
      android:layout_width="wrap_content"
      android:layout_height="wrap_content"
      android:text="Share"
      android:id="@+id/button"
      android:layout_marginTop="61dp"
      android:layout_below="@+id/imageView"
      android:layout_centerHorizontal="true" />
      
</RelativeLayout>
Following is the content of AndroidManifest.xml file.
<?xml version="1.0" encoding="utf-8"?>
<manifest xmlns:android="http://schemas.android.com/apk/res/android"
   package="com.example.sairamkrishna.myapplication" >
   <application
      android:allowBackup="true"
      android:icon="@mipmap/ic_launcher"
      android:label="@string/app_name"
      android:theme="@style/AppTheme" >
      
      <activity
         android:name=".MainActivity"
         android:label="@string/app_name" >
         
         <intent-filter>
            <action android:name="android.intent.action.MAIN" />
            <category android:name="android.intent.category.LAUNCHER" />
         </intent-filter>
         
      </activity>
      
   </application>
</manifest>
Let's try to run your application. I assume you have connected your actual Android Mobile device with your computer. To run the app from Android studio, open one of your project's activity files and click Run Eclipse Run Icon icon from the toolbar. Before starting your application, Android studio will display following window to select an option where you want to run your Android application.
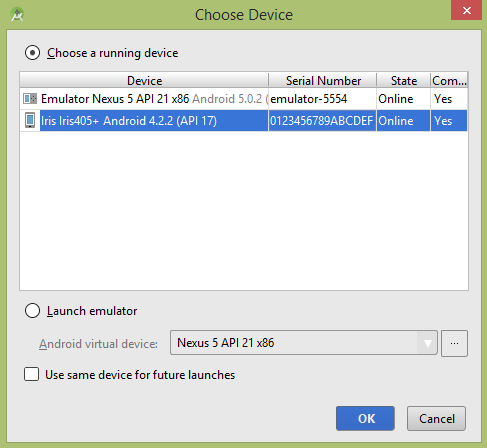
Android Linkedin Tutorial

Wednesday, 8 March 2017

Android - JetPlayer

The Android platform includes a JET engine that lets you add interactive playback of JET audio content in your applications. Android provides JetPlayer class to handle this stuff.
In order to Jet Content , you need to use the JetCreator tool that comes with AndroidSDK. The usage of jetCreator has been discussed in the example. In order to play the content created by JetCreator, you need JetPlayer class supported by android.
In order to use JetPlayer , you need to instantiate an object of JetPlayer class. Its syntax is given below −
JetPlayer jetPlayer = JetPlayer.getJetPlayer();
The next thing you need to do is to call loadJetFile method and pass in the path of your Jet file. After that you have to add this into the Queue of JetPlayer. Its syntax is given below −
jetPlayer.loadJetFile("/sdcard/level1.jet");
byte segmentId = 0;

// queue segment 5, repeat once, use General MIDI, transpose by -1 octave
jetPlayer.queueJetSegment(5, -1, 1, -1, 0, segmentId++);
The method queueJetSegment Queues the specified segment in the JET Queue. The last thing you need to is to call the play method to start playing the music. Its syntax is given below −
jetPlayer.play();
Apart from these methods, there are other methods defined in the JetPlayer class. They are defined below −
Sr.NoMethod & description
1
clearQueue()
Empties the segment queue, and clears all clips that are scheduled for playback
2
closeJetFile()
Closes the resource containing the JET content
3
getJetPlayer()
Factory method for the JetPlayer class
4
loadJetFile(String path)
Loads a .jet file from a given path
5
pause()
Pauses the playback of the JET segment queue
6
release()
Stops the current JET playback, and releases all associated native resources

Example

The following example demonstrates the use of JetCreator tool to create Jet content. Once that content is created, you can play it through JetPlayer.
To experiment with this example , you need to run this on an actual device or in an emulator.
StepsDescription
1You will use Android studio IDE to create an Android application and name it as JetPlayer under a package com.example.jetplayer.
2Install Python and WxPython on your computer from internet.
3Run the jet creator from command prompt
4Create Jet content and then save it
5Run the application and verify the results

Using JetCreator

Installing python

The first step that you need while using JetCreator is to install the python. The python can be installed from its official website here or from any where else on the internet.
Please keep in mind the version number of the python should either be 2.6 or 2.7 because this example follows that.
Once you download python install it. After installing you have to set path to the python. Open your command prompt and type the following command.It is shown in the image below −
Android Jet Player Tutorial
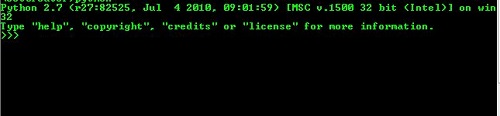
Once path is set , you can verify it by typing python and hit enter. It is shown below −
Android Jet Player Tutorial

Installing WxPython

The next thing you need to do is to install the wxPython. It can be downloaded here. Once downloaded , you will install it. It will be automatically installed in the python directory.

Ruuning JetCreator

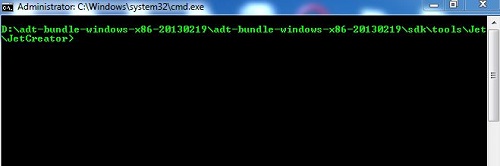
The next thing you need to is to move to the path where JetCreator is present. It is in the tools,SDK folder of the android. It is shown below −
Android Jet Player Tutorial
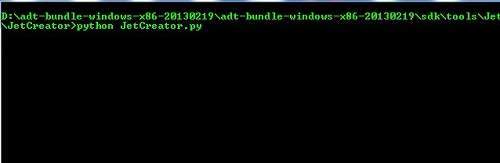
Once in the folder type this command and hit enter.
python JetCreator.py
It is shown in the figure below −
Android Jet Player Tutorial
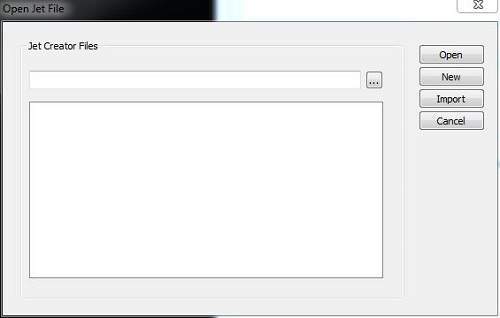
As soon as you hit enter, Jet Creator window will open. It would be something like this.
Android Jet Player Tutorial

Creating JetContent

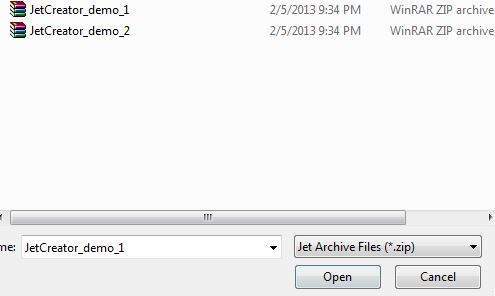
In the above Jet Window, click on the import button. And select JetCreator_demo_1 or 2 from the JetFolder from the demo content folder in the Jet folder. It is shown in the image below:
Android Jet Player Tutorial
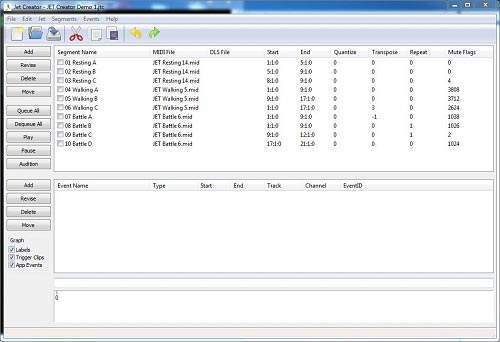
Once you import the content , you will see the content in the JetCreator window. It is shown below −
Android Jet Player Tutorial
Now you can explore different options of JetCreator by visiting the JetCreator link here. Finally in order to create .jet file , you need to save the content from the file menu.

Verifying Results

Once you got the jet file, you can play it using jet player. The main code of playing it has been given below −
JetPlayer jetPlayer = JetPlayer.getJetPlayer();
jetPlayer.loadJetFile("/sdcard/level1.jet");
byte segmentId = 0;

// queue segment 5, repeat once, use General MIDI, transpose by -1 octave
jetPlayer.queueJetSegment(5, -1, 1, -1, 0, segmentId++);
jetPlayer.play();

Android - Internal Storage

Android provides many kinds of storage for applications to store their data. These storage places are shared preferences, internal and external storage, SQLite storage, and storage via network connection.
In this chapter we are going to look at the internal storage. Internal storage is the storage of the private data on the device memory.
By default these files are private and are accessed by only your application and get deleted , when user delete your application.

Writing file

In order to use internal storage to write some data in the file, call the openFileOutput() method with the name of the file and the mode. The mode could be private , public e.t.c. Its syntax is given below −
FileOutputStream fOut = openFileOutput("file name here",MODE_WORLD_READABLE);
The method openFileOutput() returns an instance of FileOutputStream. So you receive it in the object of FileInputStream. After that you can call write method to write data on the file. Its syntax is given below −
String str = "data";
fOut.write(str.getBytes());
fOut.close();

Reading file

In order to read from the file you just created , call the openFileInput() method with the name of the file. It returns an instance of FileInputStream. Its syntax is given below −
FileInputStream fin = openFileInput(file);
After that, you can call read method to read one character at a time from the file and then you can print it. Its syntax is given below −
int c;
String temp="";
while( (c = fin.read()) != -1){
   temp = temp + Character.toString((char)c);
}

//string temp contains all the data of the file.
fin.close();
Apart from the the methods of write and close, there are other methods provided by the FileOutputStream class for better writing files. These methods are listed below −
Sr.NoMethod & description
1
FileOutputStream(File file, boolean append)
This method constructs a new FileOutputStream that writes to file.
2
getChannel()
This method returns a write-only FileChannel that shares its position with this stream
3
getFD()
This method returns the underlying file descriptor
4
write(byte[] buffer, int byteOffset, int byteCount)
This method Writes count bytes from the byte array buffer starting at position offset to this stream
Apart from the the methods of read and close, there are other methods provided by the FileInputStream class for better reading files. These methods are listed below −
Sr.NoMethod & description
1
available()
This method returns an estimated number of bytes that can be read or skipped without blocking for more input
2
getChannel()
This method returns a read-only FileChannel that shares its position with this stream
3
getFD()
This method returns the underlying file descriptor
4
read(byte[] buffer, int byteOffset, int byteCount)
This method reads at most length bytes from this stream and stores them in the byte array b starting at offset

Example

Here is an example demonstrating the use of internal storage to store and read files. It creates a basic storage application that allows you to read and write from internal storage.
To experiment with this example, you can run this on an actual device or in an emulator.
StepsDescription
1You will use Android Studio IDE to create an Android application under a package com.example.sairamkrishna.myapplication.
2Modify src/MainActivity.java file to add necessary code.
3Modify the res/layout/activity_main to add respective XML components
4Run the application and choose a running android device and install the application on it and verify the results
Following is the content of the modified main activity file src/MainActivity.java.
package com.example.sairamkrishna.myapplication;

import android.app.Activity;
import android.os.Bundle;
import android.view.View;
import android.widget.Button;
import android.widget.EditText;
import android.widget.TextView;
import android.widget.Toast;
import java.io.FileInputStream;
import java.io.FileOutputStream;

public class MainActivity extends Activity  {
   Button b1,b2;
   TextView tv;
   EditText ed1;

   String data;
   private String file = "mydata";

   @Override
   protected void onCreate(Bundle savedInstanceState) {
      super.onCreate(savedInstanceState);
      setContentView(R.layout.activity_main);

      b1=(Button)findViewById(R.id.button);
      b2=(Button)findViewById(R.id.button2);

      ed1=(EditText)findViewById(R.id.editText);
      tv=(TextView)findViewById(R.id.textView2);
      b1.setOnClickListener(new View.OnClickListener() {
         
         @Override
         public void onClick(View v) {
            data=ed1.getText().toString();
            try {
               FileOutputStream fOut = openFileOutput(file,MODE_WORLD_READABLE);
               fOut.write(data.getBytes());
               fOut.close();
               Toast.makeText(getBaseContext(),"file saved",Toast.LENGTH_SHORT).show();
            }
            catch (Exception e) {
               // TODO Auto-generated catch block
               e.printStackTrace();
            }
         }
      });

      b2.setOnClickListener(new View.OnClickListener() {
         
         @Override
         public void onClick(View v) {
            try {
               FileInputStream fin = openFileInput(file);
               int c;
               String temp="";
               while( (c = fin.read()) != -1){
                  temp = temp + Character.toString((char)c);
               }
               tv.setText(temp);
               Toast.makeText(getBaseContext(),"file read",Toast.LENGTH_SHORT).show();
            }
            catch(Exception e){
            }
         }
      });
   }
}
Following is the modified content of the xml res/layout/activity_main.xml.
In the following code abc indicates the logo of tutorialspoint.com
<?xml version="1.0" encoding="utf-8"?>
<RelativeLayout xmlns:android="http://schemas.android.com/apk/res/android"
   xmlns:tools="http://schemas.android.com/tools" android:layout_width="match_parent"
   android:layout_height="match_parent" android:paddingLeft="@dimen/activity_horizontal_margin"
   android:paddingRight="@dimen/activity_horizontal_margin"
   android:paddingTop="@dimen/activity_vertical_margin"
   android:paddingBottom="@dimen/activity_vertical_margin" tools:context=".MainActivity">
      
   <TextView android:text="Internal storage" android:layout_width="wrap_content"
      android:layout_height="wrap_content"
      android:id="@+id/textview"
      android:textSize="35dp"
      android:layout_alignParentTop="true"
      android:layout_centerHorizontal="true" />
      
   <TextView
      android:layout_width="wrap_content"
      android:layout_height="wrap_content"
      android:text="Tutorials point"
      android:id="@+id/textView"
      android:layout_below="@+id/textview"
      android:layout_centerHorizontal="true"
      android:textColor="#ff7aff24"
      android:textSize="35dp" />
   
   <Button
      android:layout_width="wrap_content"
      android:layout_height="wrap_content"
      android:text="Save"
      android:id="@+id/button"
      android:layout_alignParentBottom="true"
      android:layout_alignLeft="@+id/textView"
      android:layout_alignStart="@+id/textView" />
      
   <EditText
      android:layout_width="wrap_content"
      android:layout_height="wrap_content"
      android:id="@+id/editText"
      android:hint="Enter Text"
      android:focusable="true"
      android:textColorHighlight="#ff7eff15"
      android:textColorHint="#ffff25e6"
      android:layout_below="@+id/imageView"
      android:layout_alignRight="@+id/textView"
      android:layout_alignEnd="@+id/textView"
      android:layout_marginTop="42dp"
      android:layout_alignLeft="@+id/imageView"
      android:layout_alignStart="@+id/imageView" />
      
   <ImageView
      android:layout_width="wrap_content"
      android:layout_height="wrap_content"
      android:id="@+id/imageView"
      android:src="@drawable/abc"
      android:layout_below="@+id/textView"
      android:layout_centerHorizontal="true" />
      
   <Button
      android:layout_width="wrap_content"
      android:layout_height="wrap_content"
      android:text="load"
      android:id="@+id/button2"
      android:layout_alignTop="@+id/button"
      android:layout_alignRight="@+id/editText"
      android:layout_alignEnd="@+id/editText" />
      
   <TextView
      android:layout_width="wrap_content"
      android:layout_height="wrap_content"
      android:text="Read"
      android:id="@+id/textView2"
      android:layout_below="@+id/editText"
      android:layout_toLeftOf="@+id/button2"
      android:layout_toStartOf="@+id/button2"
      android:textColor="#ff5bff1f"
      android:textSize="25dp" />
      
</RelativeLayout>
Following is the content of the res/values/string.xml.
<resources>
   <string name="app_name">My Application</string>
</resources>
Following is the content of AndroidManifest.xml file.
<?xml version="1.0" encoding="utf-8"?>
<manifest xmlns:android="http://schemas.android.com/apk/res/android"
   package="com.example.sairamkrishna.myapplication" >
   <application
      android:allowBackup="true"
      android:icon="@mipmap/ic_launcher"
      android:label="@string/app_name"
      android:theme="@style/AppTheme" >
      
      <activity
         android:name=".MainActivity"
         android:label="@string/app_name" >
         
         <intent-filter>
            <action android:name="android.intent.action.MAIN" />
            <category android:name="android.intent.category.LAUNCHER" />
         </intent-filter>
         
      </activity>
      
   </application>
</manifest>